Need help with something CBSCentral-related? Contact Jenn Segawa (jsegawa@g.harvard.edu).
What is CBSCentral? What is the difference between CBSCentral and CBSCentral02?
It is a repository for data storage that runs on XNAT. XNAT provides infrastructure for neuroimaging data management and data sharing. See Tim O’Keefe’s presentation on CBSCentral (via Google Slides)
CBSCentral02 is a newer generation of CBSCentral. Data collected after February 6, 2024 will be on CBSCentral02. Data collected prior to that were sent to (the original) CBSCentral.
The url for CBSCentral is https://cbscentral.rc.fas.harvard.edu (link)
The url for CBSCentral v2.0 is https://cbscentral02.rc.fas.harvard.edu (link)
How do I get an account?
Because CBS Central contains sensitive patient information, it is protected within the FASSE network. Therefore, access to CBS Central is restricted to the Harvard Neuroimaging Community and their collaborators.
- The easiest way to get an account is to go to the CBSCentral website, which requires that you have a VPN connection to FASSE open.
- After you have a secure connection, you can go to the website, http://cbscentral02.rc.fas.harvard.edu.
- From the front page, click on the Register link and fill out the form.
- Enter the name of the PI or faculty member to whose lab you belong in the lab field. This is the person that will approve your account. If your PI does NOT receive an email to this effect, contact Jenn Segawa (jsegawa@g.harvard.edu).
- You are also are encouraged to use your RC username as your CBSCentral login, BUT strongly discouraged from using your RC password.
- Use a harvard.edu email address for the email.
- Once you register, you will be able to log in, but will not be able to do anything else. In order to access or archive your data, you will have to be a member of your own lab specific project.
If you don’t have a RC account (or don’t know what that is) start with our Getting Started Guide.
How do I create a new project?
After requesting an account and getting approved, you will normally be granted access to a project by the PI under whose name you requested access. However, if you are the PI or the designated administrator for the PI, you should create a new Project.
Project Naming
Some PIs prefer one account for all their imaging project, however a PI may have any number of projects. We ask, however, that you name new projects using the PI’s name for ease of identification for both the title and the Project Abbreviation. So for “Bluey Heeler” PI, you may prefer a single project named “Heeler”, or, if you’d prefer to have more than one project “Heeler_ProjectName1”, “Heeler_ProjectName2”, etc. where ProjectName1 is a name of the study.
To create a project:
- Use the “New” menu:

- Fill out the relevant information on the new project page:

- Remember to set the appropriate permissions. We recommend “Protected” since this allows users to request access relatively easily and still protects your data.

How do I access an existing project?
In order to access data, or even add data, you must first have access to the project. If you are a PI/Faculty Member, please create at least one project. (Instructions to create a new project).
To access to a project:
- Under the Projects tab on the CBSCentral home page, you’ll see a list of the visible projects:

NOTE: If you don’t see the project you’d like to access, it either doesn’t exist, or the PI who owns the project does not wish to have it publicly visible. If the later is true, you will have to contact them to ask for access. - Find the project you would like to access. Click on the Request access link.
- You will then be prompted to enter some details around your access request:
- Select “Collaborator” for read access, “Member” for read/write/archive access, or “Owner” if you want to manage access to the project.
- Under Comments, tell the PI why you need/want access.
- Click “Submit Request” and the owner of the project will grant or deny your request.
If the PI does NOT receive an email regarding your request, contact Jenn Segawa (jsegawa@g.harvard.edu).
Where is my data sent after I chose “Send to Archive” on the scanner console?
Your data will go to your project, as long as you set its path correctly on the scanner console when you registered the participant (as shown below):

Most importantly, write in the CBSCentral project name in the Study Description box (under Examination Information on the top right of the registration screen. If this is blank or has a typo, your data will be sent to CBSCentral under the Unassigned project.
I don’t see my data on CBSCentral even though I chose “Send to Archive”…where is it?! (AKA getting data out of prearchive)
Don’t panic! It’s still there! It was probably sent to the pre-archive under the Unassigned project, and you can’t see it on the CBSCentral website if you don’t have access. This happened either because the CBSCentral project name wasn’t entered or wasn’t entered correctly in the Study Description box when you registered the participant on the scanner.
Contact Jenn Segawa (jsegawa@g.harvard.edu) to help find your data.
How do I get BOLD QC to run for my data?
BOLD QC should automatically run when data is sent to CBSCentral, but if it does not, it may be because the scan Type is not set to BOLD. This will automatically change for many sequences, but if it does not, click the “Scan Type Change” option on your main project page:

After you click, there will be a list the scans CBSCentral has recently archived.

Click the checkbox next to the scans you want to define, change the Scan Type to BOLD, and then click Submit. This will fix any future scans and retroactively re-run BOLDQC for scans collected within the last 7 days.
How do I get my data from CBSCentral to FASSE?
To transfer your scanner data to FASSE, you first need the following:
Then you begin to set-up your transfer. The command is ArcGet.py which is included in the yaxil module. Additional Yaxil and ArcGet.py documentation can be found at readthedocs.
First you will need to create two files.
- Create
.xnat_authdocument and put it in your home directory (i.e.,/n/fasse/users/your_RC_user_namefolder) that contains<xnat>
<cbscentral02 version="1.5">
<url>http://cbscentral02.rc.fas.harvard.edu</url>
<username>your_RC_user_name</username>
<password>superSecretPassword</password>
</cbscentral02>
</xnat>
replacingyour_RC_user_namewith your RC user name, andsuperSecretPasswordwith your RC password.
You can either a) make this file on your own computer and transfer the file, or b) create an empty document and copy and paste the text in (via a Remote Desktop or via ssh).
Note that if you look for this folder using the File Manager on your On-Demand Desktop, you won’t see it unless you change View -> Show Hidden Files to on: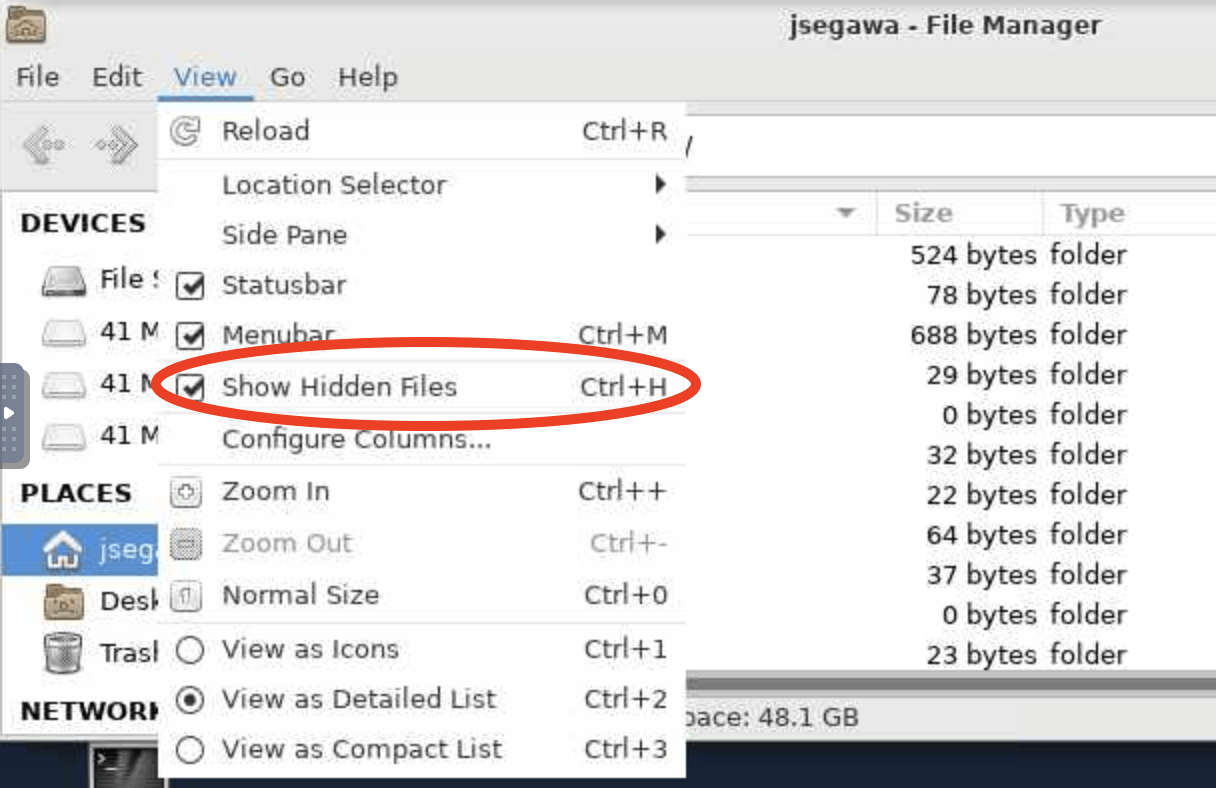
If you were using ArcGet prior to the XA30 upgrade in February 2024 and already have a .xnat_auth file, you can update it to include CBSCentral02 by running:xnat_auth --alias cbscentral02 --url https://cbscentral02.rc.fas.harvard.edu --username <username>
where<username>is your RC user name.
- You will also need to add a .yaml file to download your data in BIDS format.
- This file can go where ever you like. We recommend putting it in your lab directory folder where you might store other scripts.
- The file can be named whatever you like, we just recommend it has the .yaml extension so you remember what it is, e.g.,
your_study_name.yaml - Below is an example script: download link (txt)
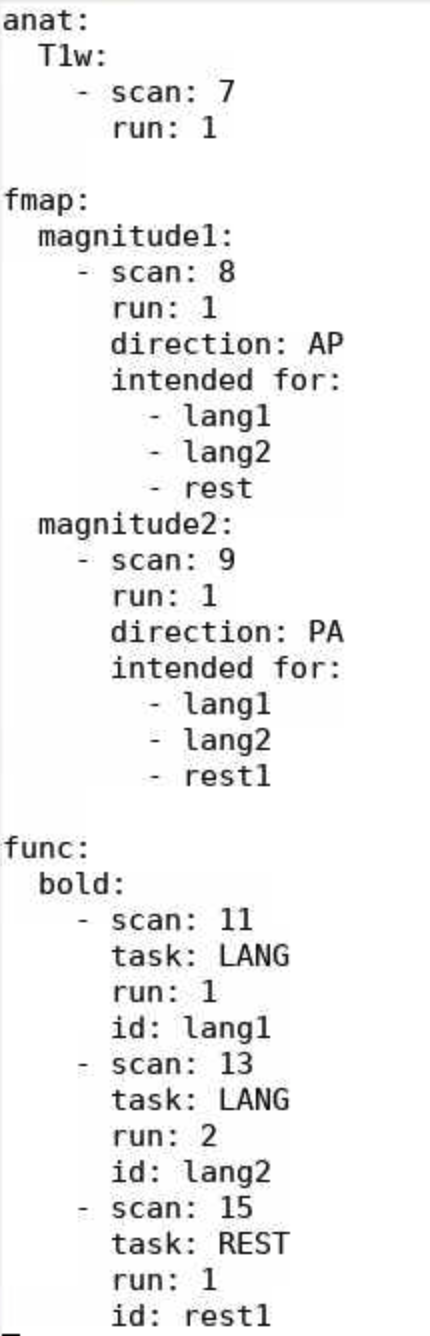
- To adjust the file to your scan:
- Edit the scan types; these are all in BIDS format.
- Note: If you are using sbref, it should should be a different modality (aka like “bold”) listed under “func”.
- If you would like to download DWI data, contact, Jenn Segawa (jsegawa@g.harvard.edu)
- The scan numbers should match those from CBSCentral, not the scanner console.
- If all your scans go perfectly, you will only need one yaml file for each study. However, if you have extra sequences, or the sequences are out of order for any participants, you may need to adjust the yaml file for each participant.
- The task name should be the same across all the runs you plan to analyze together.
- The id is only necessary if you use the intended for parameter.
- This way, even if the scan numbers change, you don’t have to adjust other references to that scan.
- This is particularly useful for fieldmaps; if you set this, fMRIPrep will automatically apply the fieldmap warping to any listed images.
- If you have multiple sets of field maps (e.g. if you took the participant out the scanner halfway through a scan), then edit the intended for field so it only reflects the appropriate scans.
- CAUTION: This document is sensitive to white space. For instance, if some of your indents include tabs but others are all spaces, ArcGet.py will fail.
- Edit the scan types; these are all in BIDS format.
Once you have the .xnat_auth and .yaml files set, open a terminal either using a Remote Desktop or via ssh, and type:
module load ncf yaxilArcGet.py -a cbscentral -p project_ID -l your_session_name -c your_study_name.yaml -o ./ -f bids- where
project_IDis the project ID on CBSCentral,your_session_nameis the Patient ID/Last Name in the Patient Registration on the scanner console, andyour_study_name.yamlis the name of the yaml file you made in Step 2. ./will write the bids directory inside the current directory. Specify another path to a directory if you would like it somewhere else.-f bidswill write your data in BIDS format. Omit this flag if you want your data in a flat structure.
- where