Need help with something FASSE-related? Here’s who to ask for help!
| Issues with: | Contact: |
|---|---|
| General help Setting up FASSE access (e.g., VPN, FASSE On-Demand Desktop) Script won’t run or runs with errors General bugs in workflows | Jenn Segawa (jsegawa@g.harvard.edu) |
| FASSE access (if it’s run in the past) Performance issues Usernames, passwords, or group membership | rchelp@rc.fas.harvard.edu (Also check their Self-Help Documentation or attend their Zoom Office Hours) |
General FASSE Questions
What is the FASSE cluster?
The FAS Secure Enviornment (FASSE) a central enabling infrastructure for neuroimaging teaching and research whose mission is to provide high performance, high power, robust, reliable and secure computer systems and human expertise to meet the challenges of neuroimaging research and teaching. The FASSE cluster is a collaboration between the Center for Brain Science and the FAS Division of Research Computing. It consists of a compute cluster with a vnc (fasseood) interface and several login nodes.
Note: We transitioned from NCF to FASSE on March 1, 2022. Many resources still refer to NCF and have not been updated to reflect this change yet. If you have any questions about these changes, you can contact Tim at tokeefe@fas.harvard.edu or RC at rchelp@fas.harvard.edu
Who may use the FASSE cluster?
The FASSE cluster is a resource for the Harvard Neuroimaging Community and their collaborators. To access, just sign up for a user account indicating your laboratory and Principal Investigator.
How do I use the FASSE cluster?
There are several main uses for the FASSE cluster. With modern technology and advanced analysis techniques, datasets can be very large and can often fill up a users’ personal computer quickly. Therefore, the FASSE cluster provides a safe and secure location to store data. In addition, the data is backed up automatically and regularly, providing peace of mind.
Second, the FASSE cluster provides a compute cluster for running your data analysis on. This can be done in several ways, but mainly by logging in remotely to the cluster via a VNC session. This is where you can run graphical programs to look at your data, and where you can submit jobs to the cluster for number crunching. In addition, if you need both graphical abilities and number crunching abilities, you can use an interactive session.
Connecting to FASSE
How do I get a RC User Account to use FASSE?
To request a new account, fill out the online Account Request form.
When you enter your PI’s name, it should auto-fill. This should also provide the options for the Approver drop-down menu.
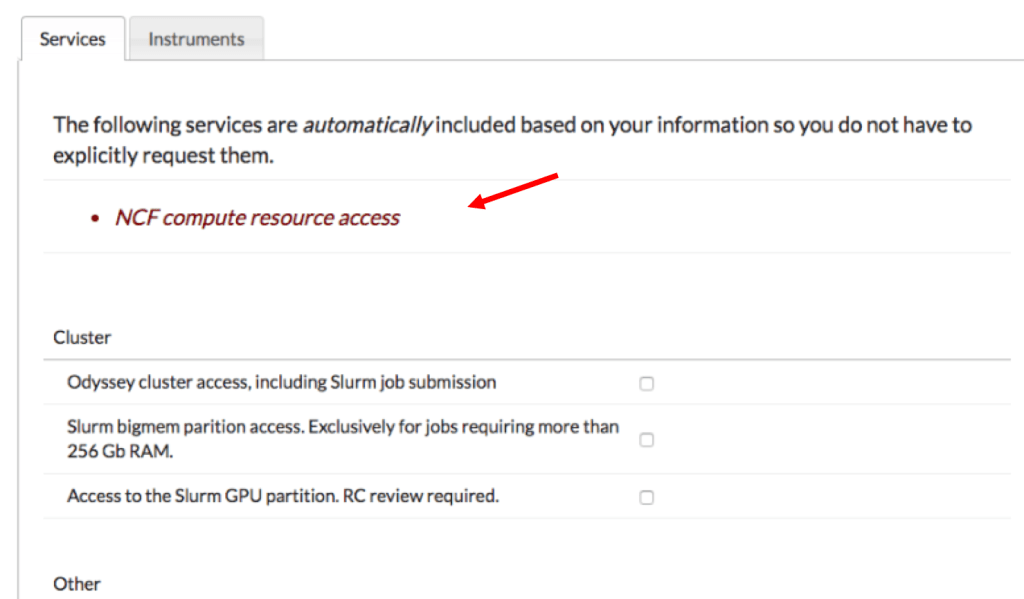
If you select a PI that is for FASSE, the last page should say that NCF (the old cluster) compute resource access has automatically been included. If for some reason it doesn’t, please email RC (rchelp@fas.harvard.edu) and let them know.
If you are an outside user, select Users without a Harvard Key (or with a key if you have one).
How do I access the FASSE cluster network remotely (VPN)?
We use two-factor authentication, which requires users to use their username and password as well as second factor, which is an openauth token, in order to gain entry to FASSE infrastructure.
1. Get your token
When you requested your account, you should have received an email with instructions for setting up the vpn. If you can’t find this, you can go to https://docs.rc.fas.harvard.edu/kb/openauth/ for instructions.
On that page, click on the https://two-factor.rc.fas.harvard.edu link.
The instructions include two main ways to get this, either from your phone or from a desktop application. Keep in mind that this software creates a token that is specific to you, so if you use a different computer, you will need to set it up again, or use the token from your phone. Therefore, if you plan on VPNing to the cluster from multiple locations it is highly recommended to install the phone app also.
Tips for desktop app: Use the .dmg or .exe apps version.
Tips for the phone app: Use the Duo Mobile version, since this is the same thing you might have already installed for the regular Harvard VPN.
However you do it, you will need the 6 digit number it generates to log into the VPN. If you have a new Mac, you might get an error message when you launch the desktop app telling you to download the Java Developer Kit. This means you will need to install java (link) to get the program to run.
See here for the instructions written by RC.
2. Get the VPN client
Now that you have the openauth token generator, you will need the actual VPN client. These steps will only need to be followed once per machine you want to log in from, and this application is not specific to a user, so if you find it already installed on a machine you can use it if you have your own personal openauth token. It is also the same one you use to VPN more generally to Harvard, you just need to change the address as listed below. To get the VPN client (if you don’t already have it) go to https://vpn.rc.fas.harvard.edu/, for the username use username@fasse. Again, you will only have to do this step once, as this will install the Cisco AnyConnect VPN Client onto your system.
The web based installation of the client almost always fails. However, after it fails, it gives you the option to download the disk-image. Go ahead and do that. When you try and open the installer package, it may give you an error that it is broken and can’t run. This is usually due to your security preferences in your web browser.
On a Mac:
- Go to System Preferences -> Security & Privacy
- Click on the General tab
- Click on the lock to allow changes
- Under the heading “Allow applications downloaded from:” chose Anywhere
Then double lick on the vpn.pkg and the installation should work. Afterwards, you can go back and set the “Allow applications downloaded from:” to be Mac App Store and identified developers.
For instructions written by RC, see here.
3. Connect!
Once you launch the VPN client, make sure the “Connect to” path name at the top is vpn.rc.fas.harvard.edu
Next you will be prompted for your username, make sure to follow it with your domain: @ncf i.e. hgranger@fasse, DON’T FORGET THE @fasse!! Next you will be prompted for your password and the Two-Step Verification Code. The password should be what ever you set your account up with, if you need to change it see here. The Verification Code field is for the 6 digit passcode from your openauth app. Once you enter this information, you should be able to connect.
Occasionally, you may have to try logging in once or twice, particularly if the token is getting ready to expire right as you put it in. Once you are connected, you want to start a VNC session by following these directions.
How do I access the FASSE – VNC – Open On-Demand remote desktop?
There are several choices to be made for your remote desktop.
First, you can choose the FAS-RC Remote Desktop or the Containerized FAS-RC Remote Desktop. You must choose the FAS-RC Remote Desktop (NOT containerized) if you plan to use Docker/Singularity containers during your session.
You can also choose three choices of partitions:
- test
- fasse,
- fasse_bigmem,
- fasse_ultramem,
- fasse_gpu, and
- remoteviz.
Which you choose depends on what you want to do, but when in doubt, use test. Also, keep in mind that you can directly ssh to the cluster via fasselogin if you don’t like the remote desktop option, or if it is full or down for any reason. You might also want to read the FAQ on submitting your jobs, because the descriptions below refer to the different queues.
test: These are limited to 8 hours, so works well for a remote desktop session.
fasse: This is just like test, but has a 7 day time limit.
fasse_bigmem and fasse_ultramem: This are for the rare case where you need a bunch of memory (greater than 30 gigs) but also need a graphics window. In general, given the different hardware of bigmem (which is also a queue you can submit jobs to via sbatch), the numbers returned could be slightly different than the ncf_holy queue. fasse_bigmem has 6 nodes with 500 gigs, and fasse_ultramem has 1 node with 2 TB. Note that batch jobs on these partitions will fail if you request < 30 gigs.
fasse_gpu: This one includes 4 V100 GPUs.
remoteviz: This one is for graphics intensive work, such as looking at your brain data and possibly editing scripts if you like the remote desktop. If you do any number crunching on here, which should generally not be done, the numbers could be slightly different than running it via sbatch to fasse_holy. If you are doing super intensive graphics like 3D brains, you should see the first tip below.
If the remote desktop seems slow, the biggest thing you can do to speed things up is GET A WIRED CONNECTION!!! The wireless network is much slower, and while convenient, is not great for remotely working with the cluster. We also now have the ability to take advantage of virtual GL which speeds up graphic intensive programs. To connect via ethernet you need to register your computer: nice instructions from SEAS.
Open On-demand Remote Desktop (VNC)
From Chrome (preferred) or Firefox while on the VPN, go to: https://fasseood.rc.fas.harvard.edu and login with your RC credentials.
Research Computing has written a nice FAQ on their website about this: (link to RC virtual desktop documentation). This covers the interactive apps, including the remote desktop session, Jupyter notebook, and Rstudio.
Tips for using the Open On-Demand remote desktop (fasseood)
Graphics intensive programs: If you are running a graphics intensive program like Freeview or FSLeyes, you can vglrun before the name of the process:
vglrun freeview -v mysubj/mri/T1.mgz
Note that vglrun MUST be used with connectome workbench(wb_view) or wb_view will not work!
Copy and Paste between local machine: Remember that the command to Copy is Control + C (as opposed to Command + C if you use a Mac) and Paste is Control + V.
If the keyboard shortcuts aren’t working, you can also use the clipboard, on the far right. To open it, click the little arrow on the left side of the desktop.
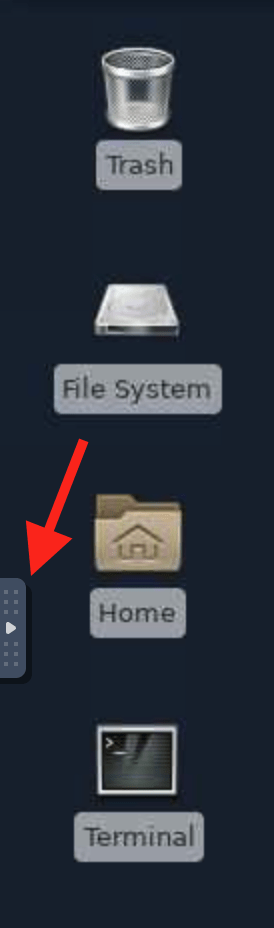
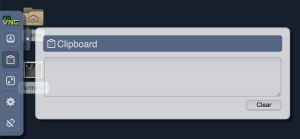
Then click on the image that looks like a clipboard. The window it opens is a place to copy and paste things back and forth, always with your laptops copy/paste commands. To get something from the cluster to show up there, highlight and middle click, or copy with your remote desktop copy commands.
Text editor: The default text editor is EMacs. However, for programming, we suggest using Sublime Text. To load it, first type module load ncf sublime_text into a Terminal. Then to open the application, type sublime_text
How to make text look nicer: To make the text look a little ‘smoother’. From within your remote desktop session, go to the top left corner to Applications ->Settings -> Appearance -> Fonts and change Hinting to None.
Edit keyboard shortcuts To change the command combinations for copy and paste: From within your remote desktop session, go to the top left corner to Applications ->Settings -> Appearance -> Settings and check Enable editable accelerators. Then go to a terminal window, click on Edit, and hover over Copy or Paste with your mouse. Then perform the key combination you would like to use. You should see the key combination listed on the right change. For reference, you can use ctrl-c for copy, and the system will smartly figure out when you want to copy something or kill a running process, for which the UNIX command is ctrl-c.
How to get your terminal windows (and directories) back when you start a new session:
The key is to ‘log out’ from the session you want to save. This won’t save your matlab session or reload modules, but it will open all your terminal windows back up in the same directory they were when you logged out. To logout:
Go to the top menu bar Applications-> Log out, its all the way at the bottom in green.
Then click on the green logout button that appears.

How do I access FASSE using ssh?
To ssh to FASSE you must be on the VPN. You can then ssh to a login node. From a mac you can use Terminal. From a PC see here. This is a great place to submit scripts from, or edit files, but you shouldn’t be doing any number crunching. Especially as the hardware differs from the cluster, so if you do number crunching here and on the cluster the numbers could differ slightly.
ssh -YC fasseusername@fasselogin.rc.fas.harvard.edu
where fasseusername is your RC username (e.g., hgranger@fasselogin.rc.fas.harvard.edu) You will prompted first for you password, and then for your “verification code” (aka the 2 factor authentication code via Duo Mobile).
The hostname “fasselogin” will redirect to one of several specific nodes, e.g., fasselogin2, whichever is least busy. You can also choose a specific one if you prefer.
You can also access a shell from the VNC server site, on the cluster tab.
Also keep in mind, if you need to do an analysis (aka number crunching) but also need graphics or if you just like a nice graphical interface you can use a remote desktop.
How do I set up my user environment/access software on the FASSE cluster?
If you are working in bash, which is the default on the FASSE cluster, you should have a file in your user directory called .bashrc. You can open/create this file using your favorite text editor, such as sublime. Our current default bashrc can be found at https://ncfcode.rc.fas.harvard.edu/nrg/default_bashrc or directly on the cluster as /ncf/mri/01/users/shared/default_bashrc/bashrc.
If you have questions about setting up your environment, contact rchelp@fas.harvard.edu. See below for how to change versions of software via modules.
How do I connect to the FASSE from a PC?
The process is the same if you want to use the Open On-Demand remote desktop client. If you want to ssh to one of the login nodes like described here. To enable X11 forwarding in PuTTY you need to configure your settings.
RC has some nice instructions here, see below for some basic steps.
Start up PuTTY. In the configuration box you need to give it the Host Name of the vncserver. The hostname should be fasselogin.rc.fas.harvard.edu for centOS7. You can also save these settings by giving your session a name in the Saved Sessions box and then click Save. You should save it again once you set the X11 forwarding.
Next, under the Connection Category, expand SSH (click where red arrow pointing) and choose X11. Click on the Enable X11 Forwarding checkbox.
Then, click on the Session Category, and save your settings again. Next time when you open this program, you can Load the saved settings.
Finally, click on Open. You should then be prompted for your username and password. When you are done, make sure you end your SSH session by typing exit at the command prompt before you X out of the PuTTY program.
What if I want to VPN to FASSE from a different computer than usual?
The openauth token code required for the two-factor authentication is specific to your username. Therefore, if you want to VPN from a different machine, you will have to set this up again. An alternative is to get the openauth app for your iphone, blackberry, or android. The instructions for doing so are here.
How do I change or reset my password?
To reset or change your password, use the Research Computing website https://portal.rc.fas.harvard.edu/pwreset/
Using Software on FASSE
What software is available on the FASSE cluster?
We use the lmod module system on FASSE. For some basic instructions from RC see here. If you don’t see something you want, there are a couple of options for getting it. If you think it might be of use to others, you can email RC (rchelp@fas.harvard.edu) and ask for it. If you think others wouldn’t be interested, you are always welcome to download software yourself. RC has a page on this, but keep in mind it was written for Odyssey. This page also has links for how to add packages to R and python.
There are two main places software might be depending on who installed it.
Research Computing
To see a full list of their software, and which version of CentOS they work with, check out their software portal.
Neuroimaging software
To see the NCF specific ones, you need to first load the ncf modules. This command should already be in your .bashrc.module load ncf
To see all the modules available to us:module avail ncf
(If this hangs, use Ctrl-C to interrupt and it should output normally.)
To select a module, for instance, a newer freesurfer:module load freesurfer/6.0.0-ncf
If you know the software you’re looking for, but are not sure of the available versions, use spider. For example, if you want to use freesurfer, type:
module load freesurfer/6.0.0-ncf
If this hangs, use Ctrl-C to interrupt and it should output normally. It will give you a list of all available modules matching that name, like this:
If there is a module missing that you would like, for instance a MATLAB version, just email RC (rchelp@fas.harvard.edu).
See the instructions below for setting SPM, as there is an additional step.
Officially Supported NCF/NRG modules:
Not all the modules we have available are under active support and maintenance. This is a list of the highest-priority modules we actively maintain. If you have a problem with any of these modules, or would like an updated version, please let us know and we will fix it. Please also let us know if you have problems with other ncf modules, but we cannot guarantee that we can provide support for all of them.
fsl/6.0.2-ncffreesurfer/6.0.0-ncfdcm2niix/2019_09_04-ncfafni/2016_09_04-ncfniftidiff/1.0-ncfyaxil/0.2.2-ncfniprepes/fmriprep/22.0.0-ncf(Call asfmriprep.sif, e.g.fmriprep.sif ./BIDSDir ./BIDSDir/derivates ...)
How can I use Python or R on FASSE?
With the new On-Demand remote desktop, you have the option of launching an interactive Jupyter notebook or an RStudio session. You can see Research Computings documentation on this, scroll towards the bottom of the VDI apps page.
To set up your python environment, you can either do it before hand by creating different conda environments: see our conda instructions below or RC’s documentation, or from within the Jupyter notebook as described in the vdi-apps page above.
They also have some specific instructions for setting up Tensor Flow. For other potential Python pages, you can use their search bar towards the top of any of the documentation pages above.
Here is information from RC on setting up your R environment.
How do I download Python libraries?
When you work on FASSE, you can’t modify the default Python set-up (including adding packages). So you can create your own “virtual environment” using Anaconda in which you can add all the packages you like!
To set-up the environment (you only need to do this once)
module load ncf miniconda3/4.5.12-ncf # this module of conda is for Python3python -m venv /path/to/dir/venv_name # e.g. python -m venv /n/fasse_home/hpotter/python_venv
To activate the environment (do this every time you want to add or use a package)
source /path/to/dir/venv_name/bin/activate# e.g. source /n/fasse_home/hpotter/python_venv/bin/activate
To add a package
- First activate the environment, as shown directly above
- Then pip as usual (e.g.
pip install nibabel) - Now whenever you activate the environment (i.e. use the
sourcecommand above), the package will be available for you to import!
To see what packages are available
- Go to
/path/to/dir/venv_name/lib/pythonX.X/site-packageswhereX.Xis the Python version (e.g.,/n/fasse_home/hpotter/python_venv/lib/python3.7/site-packages).
If you need Python 2.7
module load miniconda2/3.19.0-ncfpython -m virtualenv /path/to/venv_name(e.g.,python -m virtualenv /n/fasse_home/hpotter/py2.7_venv)source /path/to/venv_name/bin/activate(e.g.,source /n/fasse_home/hpotter/py2.7venv)- Then you can add packages as above (e.g.,
pip install nibabel)
Then you can go to /path/to/venv_name/lib/python2.7/site-packages and see what you have.
You can find more complete documentation on the RC’s Anaconda help page.
How do I save my MATLAB path?
If you get an error from MATLAB, it’s trying to save it in a default location you don’t have write access to. Instead, save it in your own user’s directory:
~/matlab/pathdef.m
And it will be read when you call MATLAB from that location.
Transferring Files To And From FASSE
How do I get files back and forth between the FASSE cluster and my computer?
This can be done in two main ways: either via the command line or via a GUI. Both have two different ways depending on how much data you are trying to transfer.
Note that all of these methods require you to first be connected via VPN (i.e. Cisco AnyConnect). They will also prompt for both your password and a “verification code” (i.e. your two-factor authentication code via Duo Mobile)
1. Command line via rsync:
This command is great for a large amount of data or big files, as it is more of a sync than a copy. This means if the transfer gets interrupted for any reason, you can relaunch it and it will pick up where it left off.
Launch the below commands from a terminal window on your computer. Make sure you are connected via VPN! (RC has a page for this with more details.)
To move data from FASSE to your computer
rsync -av your_username@fasselogin.rc.fas.harvard.edu:directory_or_file_you_want_to_transfer .
You can also transfer to specific location on your computer by replacing the last “.” with a directory path. For instance: you might run:
rsync -av hpotter@fasselogin.rc.fas.harvard.edu:/ncf/lab_directory/users/hpotter/document.txt /Users/harry/Documents/
This would transfer the dcoument.txt file from the users’s folder in their lab’s FASSE partition to their Documents folder on their computer.
You will be prompted to enter your RC password and your two-factor authentication (DuoMobile) code.
To move data from your computer to FASSE
rsync -av directory_or_file_you_want_to_transferyour_username@fasselogin.rc.fas.harvard.edu:/location/on/fasse/
For instance: you might run: rsync -av /Users/harry/Documents/document.txt hpotter@fasselogin.rc.fas.harvard.edu:/ncf/lab_directory/users/hpotter/
This would transfer the document.txt file from the users’s Documents folder on their computer to the their folder in their lab’s FASSE partition.
You will be prompted to enter your RC password and your two-factor authentication (DuoMobile) code.
2. Command line via sftp:
This is good for small to mid size files. If you have a large directory, or very large files you should use rsync. Start an sftp session from your laptop. To do this you will need to have a VPN session going, and a terminal window open:
sftp username@fasselogin.rc.fas.harvard.edu
You will be prompted for your password. It is important to note that it is easiest to start the sftp session from the directory that contains the files you want to put on FASSE or from the directory where you want files from FASSE to be placed, as the starting directory is the default directory and ‘tab completion’ doesn’t seem to work (at least not for me).
If you want to PUT files from your laptop to FASSE, go to the directory on FASSE where you want the files to end up and then type:
put filename
If you want to get files from the FASSE, go to the directory where the files are (cd, ls, and most unix commands should work). Then:
get filename
You can put or get multiple files using the * character to select multiple files.
3. GUI based via Open On-demand:
See the instructions on the Open On-demand, and go to the Files tab at the top. This is good for individual files that aren’t too large.
4. GUI based via Filezilla:
You can also use a program to link FASSE to your computer so that you can surf through the directory structures easily on both, and just drag and drop files or folders that you want.
There are a few free downloadable choices. Research computing has recently changed their recommendation from Cyberduck, to Filezilla. They have made nice instructions found here . We strongly recommend using Filezilla as a graphical SFTP client, as it will be supported by RC going forward. You can follow their instructions, except when you specify the host. You want the host to be fasselogin.rc.fas.harvard.edu
How do I get my data from the scanner and CBSCentral to FASSE?
See the ArcGet.py instructions here.
How do I look at and/or edit a text file on the FASSE cluster or my laptop?
There are several ways to ‘read’ files on the cluster.
1. If you just want a quick view of the contents without opening up the file you can use ‘more’:
more filename
Press the space bar to advance the document, and ‘q’ to quit.
2. If you want to open the file up for editing or easier viewing from the FASSE On-Demand Remote Desktop (the VNC remote desktop), we recommend Sublime.
subl filename &
This will open up a nice GUI based text editors that has all the bells and whistles like find/replace, go to line, and such. The & sign means to put the text editor in the background so that you can still type and do things in the terminal window you launched sublime from. (Note that Sublime is NOT the default editor, and double-clicking files from the File Manager will open text files in gedit.)
If you want to edit from one of the login nodes (fasselogin.rc.fas.harvard.edu), use gedit:
gedit filename &
3. On your Mac, you also have several options. We recommend is Text Wrangler, which is now called BBEdit. Make sure to install the command line editor. You can use this to open any text file. From the Finder, by right clicking, selecting ‘Open With’, and then BBEdit. We recommend BBEdit because it has a powerful find/replace function and has a unix friendly newline character. In addition, it has a command line tool, so that when you are in a terminal, you can open things right there, just like sublime on the cluster, via:
edit filename
It will also let you edit ‘protected’ files by prompting you for a username and password, where other programs like the default text editor will often just deny you permission.
File Management On FASSE
How much space will I be allocated to process and store my data?
Work and data storage space are allocated to the Principal Investigator of each laboratory. Within a lab, the PI is responsible for dividing up space, so see your PI for space requests. In addition, each user will have 20 GB of space in their home directory. Please do not use the home directory for data storage – it will run out fast! And definitely don’t run jobs from your home directory as it can slow everyone’s account down. In that case your account could be deactivated.
How do I set my permissions so that everything is readable and writable by my group?
Initially, your permissions on the cluster are set up so that new directories and files are readable and writable to you, and readable by your group, and by the world (in this case, everyone with access to our cluster). You can tell what the permissions of a file are by typing ls -l. You will see something like this:
- For a file: -rw-r–r– 1 hpotter cnl 54 Oct 5 2012 file_name
- For a directory: drwxr-xr-x 1 hpotter cnl 54 Oct 5 2012 directory_name
- For a script: -rwxr-xr-x 1 hpotter cnl 54 Oct 5 2012 script_name
The first slot is either – for a file or d for a directory. The next three slots designate the owner’s permissions (r=readable, w=writable, x=executable). The next three are the permissions for the group, and the last three are everyone else. Following this is the user name of the owner (hpotter) and then the owner’s group (cnl).
Often, you will share files with other people in your group. In this case, you might want other members of your group to be able to read and write (edit) your files. In addition, you may not want other’s on the cluster to be able to read your files. The default permissions can be set by adding a line to your .bashrc file. What you add depends on the permissions you want.
The command is umask followed by three numbers that designate the permissions separately for the three designations (users, group, everyone else).
- 0 = rwx
- 1 = rw
- 3 = r
- 7 = nothing
So if you wanted to make your files readable, writable, and executable by you and your group, but no one else, you would add the line:
umask 007
to your .bashrc file. For more information on permissions, including how to change them for just a single file or directory of files, see: https://en.wikipedia.org/wiki/Chmod