Are you new to CBSN? Here’s some step-by-step guides on how to get up and running. Each links to more detailed descriptions in our FAQ, but you can use these as an outline of the general steps you need to follow.
Note sure where or how to get started? Contact Jenn Segawa (jsegawa@g.harvard.edu) for help!
Getting Started: Administrative
How to access the CBSN Scheduling Calendar and Fiine (FAS Instrument Invoicing Environment) System
All lab members who will be present during MRI scanning sessions will need an account on the CBSN Calendar. This account is required in order to view and schedule time on the MRI scanner or any other CBSN resources. In addition, all lab members present at a scanning session must be listed in the calendar reservation using the user drop down menu.
PIs and Lab Managers/Lab Administrators will also need access to the Fiine (FAS Instrument Invoicing Environment) System in order to review and approve charges, assign expense codes, and manage users.
Instructions for signing up are below. Additional instructions for signing up and for using the resources can be found in the CBSN User Guide.
It is recommended that at least one lab manager or administrator for each lab attend a Fiine training session to learn how to use this resource effectively. Email Aaron Kitzmiller for more information and to sign up for a session.
Instructions to Access the CBSN Calendar
- Access the FAS Onboarding Tool using your Harvard Key
- On the Access Requests page, under Center for Brain Science Neuroimaging (CBSN), ‘CBSN User’ should be selected. (Please Do Not request access that you have not been told that you need. This can cause confusion and extra work for administrative staff.)
- You will then be prompted for your primary affiliation (your lab works best here). If your organization is not shown, please notify informatics@rc.fas.harvard.edu
- When your account is approved, you will be notified and should be able to login to the CBSN Calendar
Instructions to Access the Fiine (FAS Instrument Invoicing Environment) System
In addition to access to the CBSN calendar, PIs and Lab Managers/Lab Administrators should request access to the Fiine (FAS Instrument Invoicing Environment) system.
- Access the FAS Onboarding Tool using your Harvard Key
- On the Access Requests page: under Fiine (FAS Instrument Invoicing Environment), ‘PI‘ or ‘Lab Administrator‘ should be selected.
- You will first be prompted for your primary affiliation (if you manage multiple labs, your department is good here) followed by a list of labs that you administer. You can type a few characters of the lab name to filter the list. If your lab is not shown, please notify informatics@rc.fas.harvard.edu.
- When your account is approved, you will be notified and should be able to login to Fiine
How to sign up for the CBSN Users Email List
How to sign up for an MRI Safety Training Class
Information about our safety training policies and how to sign up for a class can be found on our Safety Policies and Procedures page
Special Onboarding Instructions for External (Non-Harvard) Users
- Request a Harvard Sponsored Role appointment. The PI should make this request for each lab member who will need access to the Neuroimaging Facility or the CBSN Calendar. Please contact Caroline West (wcwest@fas.harvard.edu) with the following information: name, date of birth, email address, and whether the lab member has had any Harvard appointment previously.
- Claim your HarvardKey. Once the appointment is activated, go to https://key.harvard.edu/ to claim your HarvardKey. Your HarvardKey allows you to access Harvard online services.
- Pick up your Harvard University ID. Pick up your HUID from the Campus Service Center in the Smith Center. Make sure to bring a government ID (e.g., driver’s license) with you when you pick up your HUID.
- Set up CBSN Calendar and Billing (Fiine) accounts and sign up for the CBSN Users Email List and a Safety Training Class using the instructions above.
Getting Started: Computing
How to access the computing environment (FASSE)
How to access the FASSE environment via the remote desktop or SSH:
(These are the main steps to complete to access FASSE with links to more detailed descriptions in this FAQ.)
- Set-up Harvard two-step verification (DuoMobile).
- Set up a Research Computing account.
- Set up VPN token and download the VPN client
- Log into your VPN client (Cisco AnyConnect)
- Access FASSE using a Remote Desktop or SSH (see below for details on which to use)
There are two main ways to access the FASSE computing environment:
- SSH – Simple, easy to run from a Terminal. Closes when you close your personal computer.
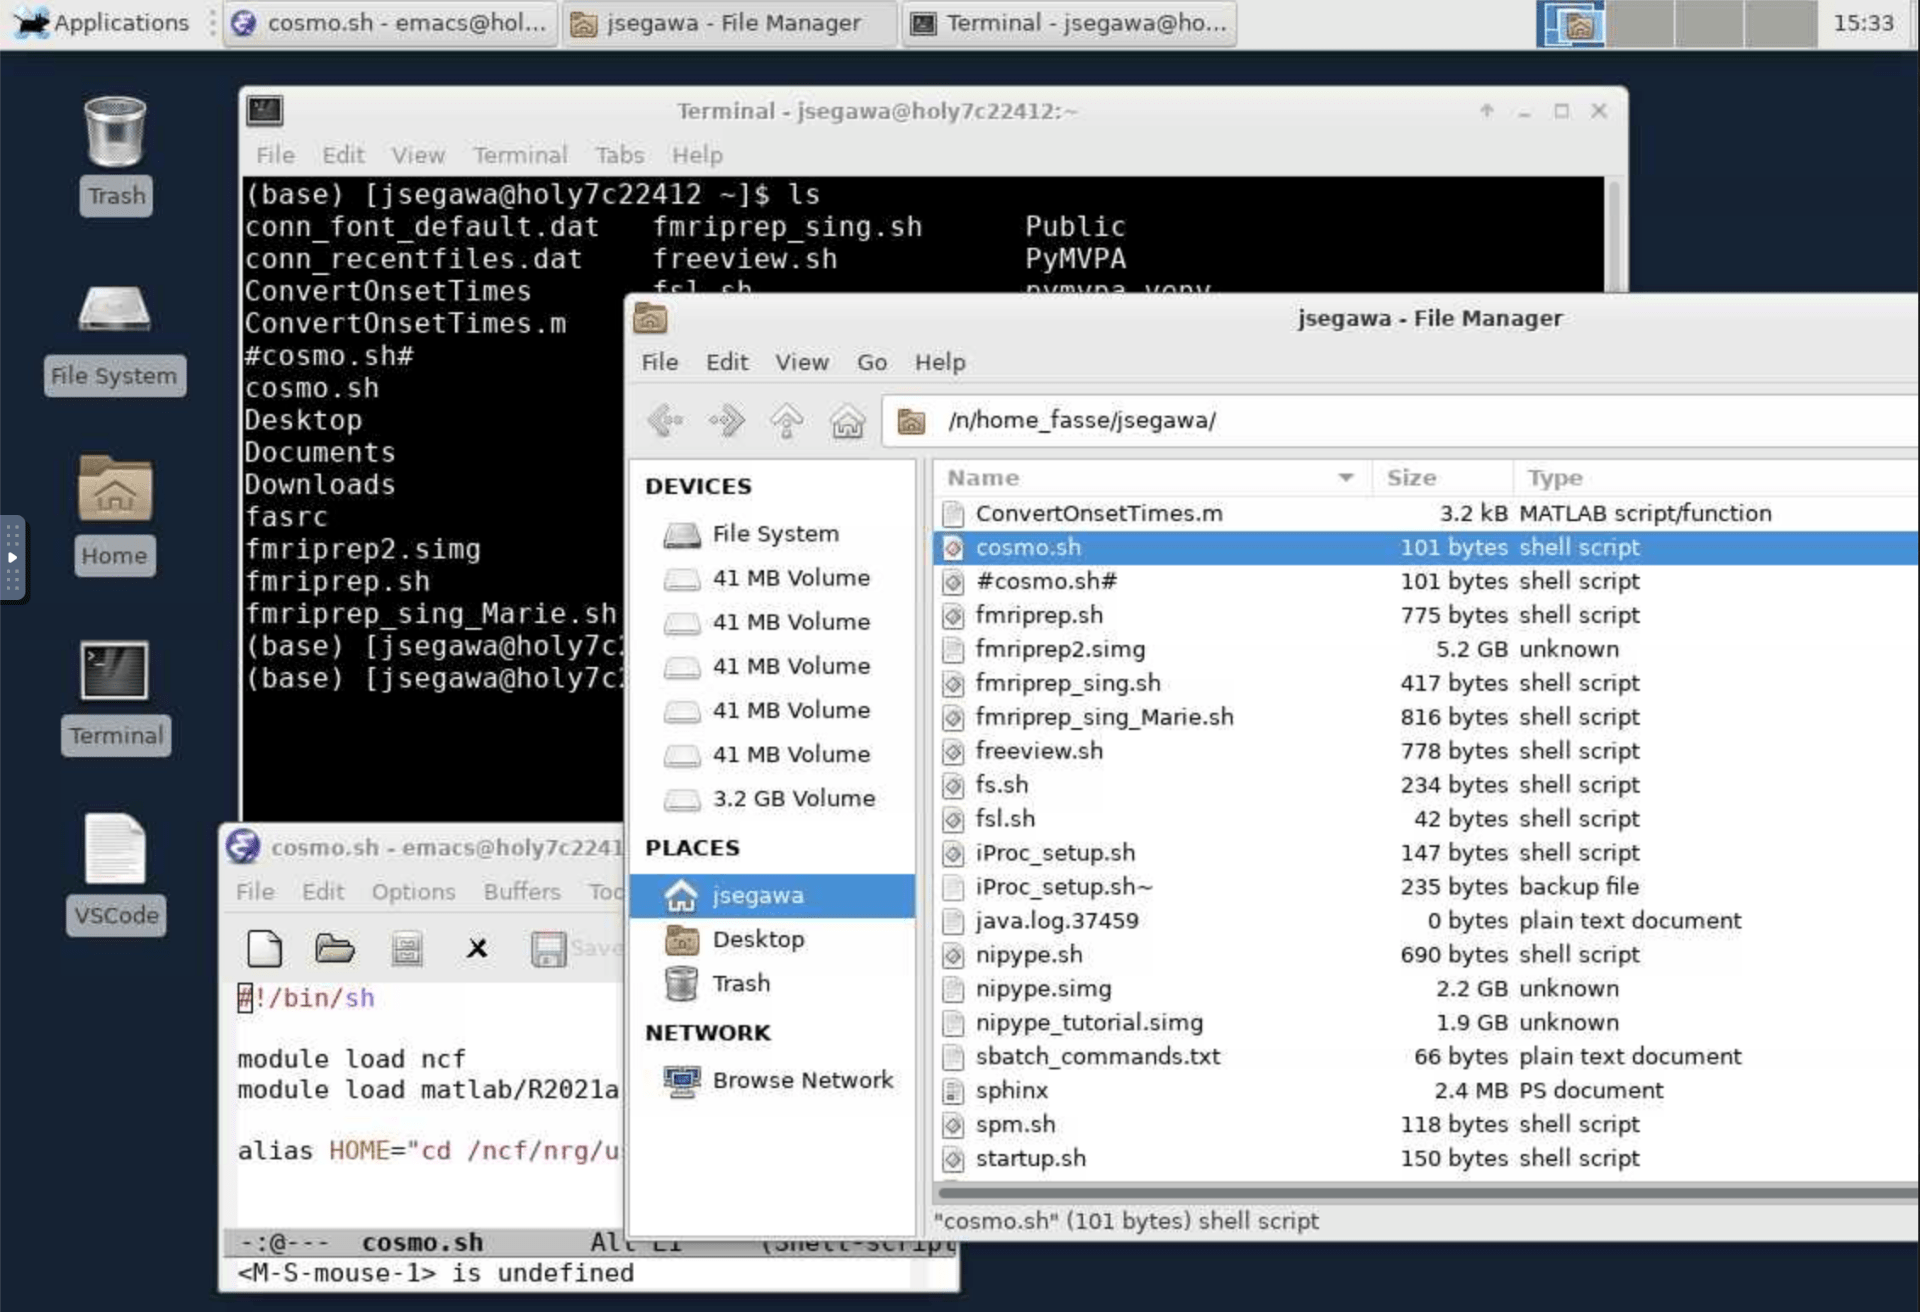
- Remote Desktop – This is easier to use if you’re editing text files, like to use a GUI for file navigation, or are using many items at once (see image below). The Remote Desktop stays open for as long as you proposed when you submit the job, even if you shut down your personal computer.
How to download your data from the scanner
Data collected on the scanner should be transferred to CBSCentral (our central data repository, see here for how to do this on the scanner console).
To make this transfer, you will need access to both CBSCentral (Steps 1-6) in order to find your session and the appropriate scan numbers) as well as to the FASSE environment so you can put your data in your lab’s cluster space.
Follow these steps to set-up downloading your data from CBSCentral. (Note, these are the main steps with links to more detailed descriptions of what to do from this FAQ.)
- Set-up Harvard two-step verification (DuoMobile).
- Set up a Research Computing account.
- Set up VPN token and download the VPN client
- Set up a CBSCentral account.
- Log into your VPN client (Cisco AnyConnect)
- Go to CBSCentral and find your session.
- Get access to the project (if you don’t have it already).
- Figure out where you want to put your data in the FASSE environment (probably in your lab’s NCF partition, something like
/ncf/your_labs_name) - Using the Remote Desktop or SSH (make sure you’re still logged into VPN), set up your .xnat_auth file in your FASSE home directory.
- Using the Remote Desktop or SSH (make sure you’re still logged into VPN), set up your yaml file.
- Using the Remote Desktop or SSH (make sure you’re still logged into VPN), run ArcGet.py (don’t forget to load the yaxil module!)
After you’ve gone this process once and set-up the necessary steps, you will only need to complete these steps:
- Log into your VPN client (Cisco AnyConnect)
- Go to CBSCentral and find your session.
- Using the Remote Desktop or SSH (make sure you’re still logged into VPN), edit your yaml file.
- Using the Remote Desktop or SSH (make sure you’re still logged into VPN), run ArcGet.py (don’t forget to load the yaxil module!)
The .yaml file (step 9 top, step 3 lower) may NOT need to be edited for every session. For most sessions, your sequences and their scan numbers should stay the same, but if things deviate during the session – you did a different number of BOLD runs, or if you had to re-run the localizer/Scout because you pulled the participant out of the scanner – you may have to add scans or edit the scan numbers of the scans.
How to run a job on the computing cluster (SLURM)
To run a batch job on the SLURM computing cluster, you will first need access to the FASSE computing environment.
Then, log into the FASSE computing environment using the Remote Desktop or SSH. (make sure you’re connected to VPN before you try to use either of those)
From there you can choose which of the 3 methods you will use to submit a batch job.
How to transfer data between your computer and the FASSE cluster
There are 4 ways to transfer files between the FASSE environment and your computer.
If you are not yet comfortable with the command line, FileZilla may be the easiest to start with.
Otherwise, we recommend using rsync.
Remember to connect via VPN first, before using rsync or FileZilla.