Need help with something related to stimulus presentation or collecting participant responses? Contact Jenn Segawa (jsegawa@g.harvard.edu).
Equipment for stimulus presentation or collecting responses
What are the trigger and button box codes?
There are currently two sources (and a third being phased out) for getting triggers and button box responses.
Celeritas PST system:
- AKA “The Claws”, ergonomic design that straps to wrist
- Device Name: Celeritas Dev
- Trigger: =
- Psychtoolbox:
'+=', or key code 46, - PsychoPy:
'equal', orkeyList=['equal']
- Psychtoolbox:
- Responses:
- Right hand: 0-thumb, 1-index finger, 2-middle finger, 3-ring finger, 4- pinky.
- Left hand:5-thumb, 6-index finger, 7-middle finger, 8-ring finger, 9- pinky
- Psychtoolbox: the key codes start at 30 for 1, and go up to 38 for 9, with 0 being 39.
- More info: Celeratis FAQ.
HCP boxes:
- With the blue and yellow buttons
- Device Name: 409
- Trigger: 5
- Psychtoolbox:
'5', key code 34 - PsychoPy:
'5', orkeyList=['5']
- Psychtoolbox:
- Responses:
- Left blue button: 1, right yellow button: 2
- Psychtoolbox: key codes 30 and 31
The third, non-fiberoptic, old brown rectangle boxes, have the same key codes as the Celeritas system. This should not generally be used unless it is related to an old study, as they can cause RF issues with your data.
There are also response boxes with robust construction and large buttons for children. They are not on the Celerais system. Ask Jenn (jsegawa@g.harvard.edu) if you are interested in using these.
If you connect the desired USB cable (labeled HCP or Celeratis) to your stimulus computer, you should receive a ‘trigger’ from the scanner for each TR that registers as a key press. The first one will come after any dummy or setup scans, so when the first actual image that gets saved. You can add a call in your experiment that waits at the beginning until you get the first trigger.
Keep in mind that triggers will continue throughout the experiment, once for each TR. Some researchers use this to synchronize other aspects of their experiment, while others just ignore them. However, it is possible that a trigger signal could come through at the same time as a button press. In this case, some software packages might only take one of the presses. This is something that you need to test.
For more tips on getting triggers and button box responses in Psychtoolbox see here.
How do I use the Celeritas button boxes (aka “The Claws”)?
The Celeritas button box system uses the large white box on the top shelf above where the old green circuit board is. It has its own USB cable. You will get the trigger and button box responses through this cord as keyboard presses (mappings above). The buttons will light up when the subject presses them, and the trigger will show up as a light on the far right labeled trigger. The name of the box is Celeritas Dev; see below for how to use this information.
Additional step
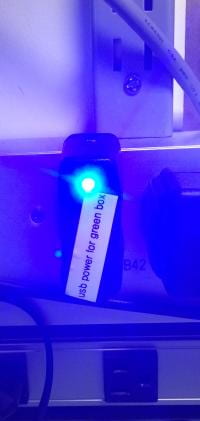
There is one additional step required. The trigger initially goes through an in-house built green box that converts the optical signal from the scanner to an electrical one. This box needs power via the USB cable connected to it. Since this box is not plugged directly into your laptop, it needs to get power another way. Please plug it into the black USB plug with the blue light, labeled usb power for green box.
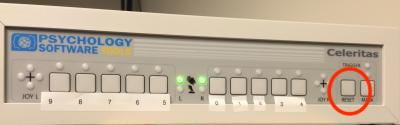
The Celeritas box provides feedback on the state of the system.
This is what a happy box looks like. Two green lights in the center.

If it is unhappy box , the green lights in the center may be blinking.
Or just one of the green lights may be on.
Reset the box
To correct any of these issues, hit the reset button on the far right.
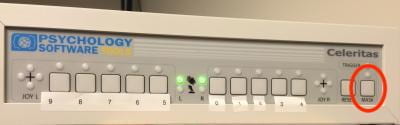
Suppress the trigger
If you want to turn off the trigger after the first one comes through, you can hit the mask button on the far right. A yellow light will appear above the button, and when triggers come through, the trigger light will be yellow instead of green. Please turn the trigger mask off at the end of your session by hitting the mask button again.
In the scan room
Inside the scan room the subject response buttons are hanging on the wall. The boxes have an attachment to strap them on to the participant’s arm. This should prevent the subjects from dropping them. The angle of the box with regard to the wrist strap can be adjusted by loosening the screw on the back and angling it. They wrist strap can also be removed completely by unscrewing the screw in the back. Just make sure to replace it after you scan for the next user.
The cables for these are a little cumbersome, as they made to not be able to bend sharply, and should not be bent or stepped on, as they are fiberoptic and fragile. If they get tangled, you can separate the cable in the middle (gray connectors) and letting the cable uncoil. If you do this, the box will loose connection with the button box. The green light won’t be on next to which ever one you disconnected. To fix this, the box will have to be reset.
Can I record eye-movements during scanning?
Yes, you can with our Eyelink eye tracker system. The system is fairly easy to use, particularly for those who feel comfortable with Psychtoolbox. You can communicate with the eye tracker from Psychtoolbox, making it easy to convert any pre-existing experiment into an eye tracking experiment. Alternatively, if you are not comfortable with Psychtoolbox and prefer more of a GUI-oriented experience, Eyelink comes with its own package for designing your experiment and analyzing the data.
How do I calculate degrees of visual angle at the scanner?
To calculate degrees of visual angle, you need to know the viewing distance and size of the projected image. The viewing distance is measured from the screen to the mirror to the subject’s eyes. Therefore, it does vary for each person, so this is only approximate. It will be most accurate if you align the laser of the scanner to the marks on the coil, and make sure the participants brow is lined up with the marks on the coil. (Viewing distance: Prisma: 104cm)
The width of the displayed image can change depending on what filters are on the projector, with a max difference of around 1 degree of visual angle. These are changed periodically to keep the luminance approximately constant over the bulb life. Therefore, it is safest to measure it each day. There is a measuring tape in the cabinet to the right of the magnet. It can be measured at the back of the scanner, just make sure not to touch the screen: for the Prisma, the image size is between 41.9 and 44cm.
Then there are several ways you can calculate it, but this is what I have used:
pix_per_deg = ((pi * rect(3)) / atan((mon_width/viewing_dist)/2)) / 360;
Where pi is the mathematical term, approximately equal to 3.14159 and rect(3) is the size of the screen (in pixels) in the horizontal dimension, or the horizontal resolution. Then, you can specify the size of your stimulus in degrees of visual angle, and multiple it by pix_per_deg to get the number of pixels it should be. For instance if you wanted a square of 5 degrees, the length of a side should be 5*pix_per_deg pixels.
With the Prisma setup, the eyetracker and regular screen are at the same distances/size. Therefore use the numbers above (41.9 – 44 cm).
What software should I use to present my stimuli?
In general, we recommend using PsychoPy, a Python-based package. It works well across operating systems, has options to design and edit paradigms with scripting or with a GUI, and can present paradigms online, and it’s completely free.
Many folks also use Psychtoolbox, a MATLAB-based toolbox. It has been around for longer, so your lab may have scripts that were used in the past. However, Psychtoolbox strongly discourages use with Macs and discourages use with PCs. Only GNU Linux is recommended.
PsychoPy
How do I use PsychoPy?
More info coming soon!
Psychtoolbox (MATLAB)
Why I am I missing the trigger or the occasional button box response in Psychtoolbox?
Generally speaking, keyboards are not the best way to transmit time critical information to a computer. Keyboard input is typically logged into a hardware buffer, which is lazily queried by software with the full assurance that no key presses will be missed. This is why you sometimes type into a document or web browser but don’t see a change on the screen until seconds later when a stream of characters appears nearly instantaneously. At such times, the software (or OS) was too busy to interact with the keyboard but all the key presses were faithfully logged into the buffer.
There are a multitude of software languages and programming environments that allow users to get information from the keyboard buffer. While we certainly are not aware of the entire spectrum of techniques that users of the MRI facility employ, we will focus on Matlab and the Psychtoolbox to demonstrate a few ways to interact with key presses, and suggested the a preferred method.
One of the issues that contribute to some users experiencing missed triggers or button box responses is that the signal coming from the scanner lasts about 8ms. In general, that is very short, and if your computer is busy doing something, they may not register depending on what way you are using to poll the keyboard.
In Psychtoolbox, there are two main strategies for reading keyboard presses. The first, and recommend method, is KbQueueCheck, a kind of buffer, where keyboard presses are stored and then can be read back at anytime. This utilizes a set of function calls based around KbQueueCheck which looks into the keyboard buffer for key presses. Note that this is a less user-friendly method, and while many methods found on the web suggest you look for devices, but Windows unifies all keyboard devices.
Psychtoolbox offers CharAvail to query the keyboard buffer and GetChar to fetch the character information when its present. There are problems using this call when implementing Java, but seems to imply that it will work when using Windows -nojvm Matlab.
These two approaches should be contrasted to the algorithm that many groups appear to be using. This problematic technique relies on functions based on “KbCheck“. “KbCheck” does not query the keyboard buffer for stored characters but rather asks if a key is currently pressed down. KbCheck is placed in a loop that tries to cycle fast enough so that it can poll the keyboard directly without missing a key press.
However, given the short (8ms) times that the keys at the scanner appear to be pressed, it is easy to miss them if you are constantly updating your stimulus, or use the KbCheck(-1) to check all devices, which takes longer, or even if you have the waitsecs(.01) in your checking loop that they suggest to keep from having your priority demoted.
How do I use KbQueueCheck from Psychtoolbox?
See here for a summary of the reasoning behind using KbQueueCheck, and the Psychtoolbox doc about it.
The idea is that all keyboard presses will be put into a queue, as opposed to KbCheck which asks if a key is pressed at the very moment you call it. KBQueueCheck will only log key presses from one device at any given time, so you must give it a device number (see here for how to get this number).
You can also give it a list of keys to look for, so that you can look for just a subset of keys. This can be handy if you don’t want your subjects to accidentally trigger your experiment.
Before using KbQueueCheck you must first setup the internal queue. This is done via KbQueueCreate, which takes the device number and list of keys to check. Once set up, a queue can be used multiple times, as long as the device and keys of interest don’t change.
To change to a different keyboard or set of keys, simply call KbQueueCreate again with the new specification. It is not necessary to call KbQueueRelease (or ‘clear mex’) before a second call to KbQueueCreate, but it should be called when it is no longer needed to release resources. Since creation of a queue involves some computational overhead, delivery of keyboard events to the queue is not started automatically. This allows the queue to be created in advance during a phase that is not time critical and then subsequently efficiently started in a phase that is potentially time critical. Delivery of events to the queue is started by a call to KbQueueStart. Delivery can subsequently be stopped (without losing any queued events that have not yet been retrieved) by a call toKbQueueStop.
Events can be retrieved by calling KbQueueCheck, which will report about new events since the most recent call to KbQueueStart, KbQueueCheck, KbQueueFlush or KbQueueWait. Although a call to KbQueueStart should suffice to flush a queue that is not actively receiving events, KbQueueFlush should be used preferentially to flush events from an actively running queue. Analogously to KbWait, the function KbQueueWait can be used to pause execution until a keypress has taken place (and unlike KbWait, will respond to very brief events like from our scanner). Like KbWait, KbQueueWait does not directly identify the specific key that was pressed, and it should be kept in mind that the keypress will already have been removed from the queue when KbQueueWait returns and its identity therefore cannot be recovered by an immediate call to KbQueueCheck. If the identity of the pressed key is needed, KbQueueCheck should be called directly in a tight loop instead of using KbQueueWait. If only one key is of interest, another option is to specify only that key when creating the queue with KbQueueCreate. Here is a more specific example:
- Get device name
- Make a list of keys you want
keys=[30,31,32,33,46];   %%all keys on right hand plus trigger, can be found by running kbdemo
keylist=zeros(1,256);   %%create a list of 256 zeros
keylist(keys)=1; %%set keys you interested in to 1 - Make queue
KbQueueCreate(device,keylist); %%make cue - Start queue: This can be done anytime, or right before you want to get responses.
KbQueueStart(); %%start listening - If you started the queue early, or want to make sure you get the ‘next’ keypress, you can clear the queue:
KbQueueFlush(); %%removes all keyboard presses - Get responses. This call gives you information about keypresses on the specified device since the most recent call to this routine, KbQueueStart, or KbQueueWait. This is an example of a loop to wait for the trigger:
pressed=0;
while ~pressed
    [pressed, firstpress] = KbQueueCheck();   %%check response
end
This loop will exit when a key is pressed. If you want it to only look for the trigger, only include the trigger code in your keylist. However, you will then have to recreate your queue to include the response buttons you want to get also. This can take a little bit of time so you should do it before you need it (like right after get trigger but before first trial starts). Also, this loop is looping over very little, so there is concern that the operating system will get unhappy at Matlab for sucking up all the processing and will demote the priority of the program. There are two ways to correct for this. The first is to include a waitsecs(.01) in the while loop, this helps keep the OS happy. Alternatively, you can set the priority of the program after the trigger is registered and the loop ends: Priority(MaxPriority(wp)). - Here is an example of how to get responses and RTs.
- Display your stimulus
- Get the current time:
start_resp_time=GetSecs; - Clear the queue:
KbQueueFlush(); - Look for responses, this can be in the loop where you wait for the length of your stim, or maybe while you are presenting a movie or other stim.
[pressed, firstpress]=KbQueueCheck(); %check response
if firstpress(resp_key)>0   %%if hit response key
    data(trial_num, 1)=GetSecs-start_resp_time;
end
Note: The key buffer can fill up, so if you aren’t going to be checking for responses very often, or you have a very short TR, you should edit the queue after you get the first trigger so that it will no longer register trigger responses.
How can I prevent participant button presses from accidentally triggering my paradigm script in Psychtoolbox?
KbQueue Method:
If you are using the recommended KbQueueCheck method, you can create the queue to only look for the trigger. To do this, make your keylist contain all zeros except for the trigger:
keys=[46];%% trigger
keylist=zeros(1,256);%%create a list of 256 zeros
keylist(keys)=1;%%set keys you interested in to 1
Then, after you receive the trigger, you can change your queue to include just the buttons you want to look for.
KbCheck Method:
If you are using KbCheck you can disable certain keys, then KbCheck and KbWait will ignore them:
disablekeys=[39,30,31,32,33];%%all the keys on the right hand button box
olddisabledkeys = DisableKeysForKbCheck([disablekeys]);
Then afterwards you can reset to exclude nothing:
olddisabledkeys = DisableKeysForKbCheck([olddisabledkeys]);
Or to exclude the trigger
olddisabledkeys = DisableKeysForKbCheck([46])
Note: These settings are reset to all keys enabled with a call to clear all
How can I automatically determine the device number for the trigger/button box?
While the device number corresponding to the signals from the scanner can vary depending on what you have connected and in what order you connected things, the device name is always the same. Therefore, you can use this to determine the device number. It varies for the different response box choices:
- Celeritas boxes (aka “The Claws”), that strap to the participant and are ergonomic: Celeritas Dev
- HCP boxes, with the blue and yellow buttons: 409
deviceString='Celeritas Dev';%% name of the scanner trigger box
[id,name] = GetKeyboardIndices;% get a list of all devices connected
device=0;

for i=1:length(name)%for each possible device
    if strcmp(name{i},deviceString)%compare the name to the name you want
        device=id(i);%grab the correct id, and exit loop
        break;
    end
end

if device==0%%error checking
    error(‘No device by that name was detected’);
end
You can do the same thing with your internal keyboard for when you run the experiment outside of the scanner.
For my mac, this is called: ‘Apple Internal Keyboard / Trackpad’. To find out what yours is called, from the Matlab command window:
[id,name] = GetKeyboardIndices
This should print out a list of IDs and names. If the names come up as something like [1×34 char] because they are cell arrays, you can see them by typing: name{:}